This thread has been locked.

If you have a related question, please click the "Ask a related question" button in the top right corner. The newly created question will be automatically linked to this question.

TPS65086100RSKT

Other Parts Discussed in Thread: CSD87350Q5D, CSD87588N, CSD87381P, CSD86360Q5D, CSD87355Q5D, BOOSTXL-TPS650861, TPS650860EVM-116, TPS650861

Hi

I want to use the TPS65086100RSKT PMIC.


I want to use BUCK3,4,5 for the following (PVIN = 3.3V):

1.8V@0.25A peak current.

0.95V@1.8A peak current.

0.82V@2.2A peak current.

  • Can I use the LPWI201608HR47T (Littelfuse) inductor for those BUCK?


I want to use BUCK6 for 1.2V@26A peak current. The input voltage is 6.4V-13.2V (Nominal 12V).

I will use the CSD87350Q5D external FET that supports this high current.

  • Can I use the 74431323016 (Wurth) inductor for this case?


I want to use BUCK2 for 0.82V@19A peak current. The input voltage is 6.4V-13.2V (Nominal 12V).

I will use the CSD87588N external FET that supports this high current.

  • Can I use the SRP7020TA-R20Y (Bourns) inductor for this case?


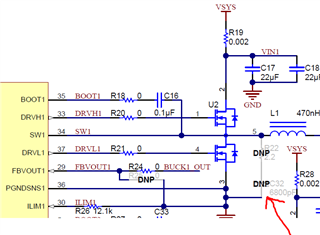
I want to use BUCK1 for 2.5V@11A peak current. The input voltage is 6.4V-13.2V (Nominal 12V).

I will use the CSD87381P external FET that supports this high current.

  •   Can I use the SRP7020TA-R47M (Bourns) inductor for this case?

Thanks,

Moshe

  • Hi Moshe,

    Thanks for reaching out. I will be going through the information on this E2E and an update will be provided within the next two business days. 

    Thanks,

    Brenda

  • Hi Moshe,

    I have reviewed your questions on this E2E and here is my feedback: 

    For the Buck converters (Buck 3/4/5) 

    • As noted in the datasheet, internal parameters are optimized for either a 0.47uH or 1uH inductor. The inductor you planning to use (LPWI201608HR47T) seems to be 470nH with a max current of 4A (5A saturation). There shouldn't be any issues using that inductor under the voltage/current conditions you specified in the previous message. The inductor is also comparable with what we are using in our EVM (470nH, 4.5A). 
    • Please note 
    • Section "6.2.1.2.2.1 Selecting the Inductor" in the datasheet has additional information on the inductor selection for the buck converters.

    For the Buck Controllers (Buck 1/2/6)

    • Are those current values peak current for the inductor or maximum load current?
    • If they are peak currents, did you use equation 6 in the datasheet to get those values?
    • If those values provided represent the maximum load you are expecting in your application, then I would choose inductors with higher current ratings to make sure the current can be handled across temperature and taking into consideration the component tolerance. 
    • As recommended in the previous E2E post (link) Please use the two equations in the capture below (which can also be found in the datasheet) to calculate the inductor value as well as the peak current rating. 

    Thanks,

    Brenda

  • All those current values are max peak current on the load.

    For the Buck Controller (Buck 1)

    I want to use BUCK1 for 2.5V@11.2A max peak current on load. The input voltage is 6.4V-13.2V (Nominal 12V).

    I will use the CSD87381P external FET that supports this high current.

    According to equation 5:

    L=0.44uH-0.88uH (When KIND = 0.4-0.2)

    I choose inductor L=0.47uH.


    According to equation 6:

    IL (Max) = 13.3A

    •   Can I use the SRP7020TA-R47M (Bourns) inductor for this case?


    For the Buck Controllers (Buck 2)

    I want to use BUCK2 for 0.82V@19A max peak current on load. The input voltage is 6.4V-13.2V (Nominal 12V).

    I will use the CSD87588N external FET that supports this high current.

    According to equation 5:

    L=0.1uH-0.2uH (When KIND = 0.4-0.2)

    I choose inductor L=0.2uH.

    According to equation 6:

    IL (Max) = 20.9A

    • Can I use the SRP7020TA-R20Y (Bourns) inductor for this case?


     For the Buck Controllers (Buck 6)

    I want to use BUCK2 for 1.2V@26A max peak current on load. The input voltage is 6.4V-13.2V (Nominal 12V).

    I will use the CSD87350Q5D external FET that supports this high current.

    According to equation 5:

    L=0.1uH-0.21uH (When KIND = 0.4-0.2)

    I choose inductor L=0.16uH.

    According to equation 6:

    IL (Max) = 29.4A

    • Can I use the 74431323016 (Wurth) inductor for this case?
  • Hi Moshe,

    Thanks for clarifying the current values provided were the max current on the load! Those inductors can technically be used if an evaluation is run on a prototype board before implementation. If the absolute max current on the load is 11.2A and 26A for Buck1 and Buck6 respectively, then I would not expect any issues with those inductors. Please also note some of those inductors will have +/-30% tolerance and values will vary across temperature so the inductance vs current plots for different temperatures must be reviewed as well.

    For Buck2,  the max load current in the conditions provided was 19A and the inductor Irms is 18A so I recommend choosing a Q200 compliant inductor with higher current rating.

    Thanks,

    Brenda

  • Thanks Brenda!


    • For Buck 2, I changed the inductor to 0.15uH, supports 19A.

                Part number: 0518CDMCCDS-R15MC


                According to equation 6:

                IL (Max) = 21.5A

    • Can I use this inductor for this case?


    • I changed the inductor for Buck 1 to SRP5020TA-R47M.Do you see any problem to use this inductor?


    Regards,

    Moshe

  • Hi Moshe,

    For Buck2, I didn't do a deep investigation on that inductor but took a quick look at the spec and it seems like Irms is 19A plus the saturation current is higher than the peak current that was calculated with equation [6] so it should be fine. 

    For Buck1, I believe the one you were planning to use before had higher current ratings but if you don't expect your load current to go above 11.2A (abs max) then it should be fine as well.  

    Please note for any chosen components we strongly recommend running an evaluation on a prototype board before implementation. 

    Thanks,

    Brenda

  • Thanks Brenda!

     I will try to use the TPS65086x EVM board to do evaluation for those inductors with the external FETs.


    Do you have any recommended replacements for the following external FETs?

    CSD87350Q5D,

    CSD87381P,

    CSD87588N,


    Regards,

    Moshe 

  • Hi Moshe,

    We recommend the FETs listed in the datasheet which are the ones that have been tested with our PMIC. Other options like CSD86360Q5D and CSD87355Q5D could be evaluated as well depending on the required maximum current. For more options, please visit the power block product website (https://www.ti.com/power-management/mosfets/power-blocks/products.html) or submit another E2E with the FET part number for which you are looking the replacement so it can be assigned to the team supporting the power FET blocks. 

    Thanks,

    Brenda

  • Thanks Brenda,

    I want to use TI External FET by i need that the component will supports RoHS/REACH Cert/Halogen-low/free.

    The CSD87350Q5D is not REACH compliant and also, not low Halogen/Halogen Free.

    Do you have any replacement for this part?

    Regards,

    Moshe

  • Hi Moshe,

    Most of the external FETs that we recommend in the datasheet are "Affected" REACH compliance. The definition for each compliance status can be found in our Environmental information website. Here is the direct link to the statement: TI REACH Statement. To get additional environmental, reliability and packaging information for the NexFET Power Blocks, I recommend using the TI Material content search tool where you can locate product RoHS, REACH, Green status and material content details.

    I also recommend submitting a new E2E with the part number for the FETs that meet your power requirements (i.e CSD87350Q5D) and ask if there is a replacement with equivalent performance and REACH compliance. The new E2E will be assigned to the team responsible for the FET products.

    Thanks,

    Brenda

  • Thanks Brenda!


    Regarding TPS65086x Evaluation Module.


    This board includes Bootstrap capacitor (CBOOT) for example C16 – 0.1uF.

    This capacitor supports 10V voltage rating DC.


    The BOOTx pin voltage can be high voltage like 25V.

    Could you please check why Evaluation Module supports CBOOT capacitor of 10V voltage rating DC and not 50V for example?


    I want to send you my TPS65086100RSKT schematics design for review. How can I send it?


    Regards,

    Moshe 

  • Hi Moshe,

    Why would be need a 25V (or 50V) rated bootstrap capacitor? The three buck controllers should have their corresponding DRV5Vx pin connected to a 5V supply (typically connected to LDO5P0). The BOOTx pin will have the voltage at one side of the bootstrap capacitor but that is not the same as the voltage across the capacitor. How much voltage are you measuring across the bootstrap capacitors on the EVM when the low side FET is OFF? 

    Regarding the schematic review, we have made available a schematic/layout checklist to help our customers during the design process. Here is the link to the document: TPS65086x Schematic and Layout Checklist (Rev. A). It can also be found in the product folder under Technical Documentation. Once the checklist is complete, if you need a second review from our end please attach the form to this E2E and send your schematic though a private E2E message. 

    Thanks,

    Brenda

  • Thanks Brenda!


    • I didn’t understand how to send you my schematic using a private E2E message. 


    • Regarding control signals: DATA, CLK, CTL1–CTL6, GPO1–GPO4, IRQB.


    According to recommended operating conditions in the data sheet those signals can operate up to 3.3V.

    According to the check list I need to connect those signals to 1.8V logic.


    Can I connect those signals to 3.3V logic?


    • I found replacements for CSD87350Q5D External FET:   SiZF300DT,SiZF360DT 

    What do you think about those devices?


    Regards,

    Moshe 

  • Hi Moshe,

    I have sent a request to enable the option of private E2E message so you can share the schematic. Please let me know if you haven't receive it on your end. Regarding the pull-up supply for the digital IOs that you have listed above, the recommended voltage range is up to 3.3V (MAX) and we recommend using a 1.8V supply which is what you'll find in the test conditions for the digital parameters.

    • I found replacements for CSD87350Q5D External FET:   SiZF300DT,SiZF360DT 

    What do you think about those devices?

    I'm not familiar with those FETs but if they have equivalent or better performance to the ones we recommend in our datasheet, then you can run a prototype evaluation with those. 

    Thanks,

    Brenda

  • Thanks Brenda!

     I sent you my PMIC schematics by private message. Please review it.


    • Regarding the schematics checklist file.

    In the ILIM1 pin I saw the following

    “The resistor value can be calculated using the ILIM resistor equation included in the data sheet or the calculator included on the "Controller Calculator" sheet in this workbook.”


    I didn’t find the "Controller Calculator" sheet. Sorry.


    • Regarding FBVOUT1pin

    “Connect to positive terminal of BUCK1 output capacitors. A 0 Ω resistor or RC filter can be added on prototype boards if desired.”

     Could you please add more info on the RC filter?

    • Is there any way to check my power sequence design using the TPS65086x Evaluation Module? (Without Burning in the OTP)


    Regards,

    Moshe

  • Hi Moshe,

    Just wanted to confirm your schematic has been received! Our bandwidth is currently very limited and it will take about 7 business days before we can provide feedback. 

    Thanks,

    Brenda

  • Thanks Brenda!


    Regarding FBVOUT1pin in the schematics checklist file

    “Connect to positive terminal of BUCK1 output capacitors. A 0 Ω resistor or RC filter can be added on prototype boards if desired.”

     Could you please add more info on the RC filter?


    • Regarding the "ILIM Calculator" sheet.

    Can I use the “SLVA735_TPS65094x Schematic Checklist, Layout Checklist, and ILIM Calculator.xlsx file?

    Is this ILIM calculator support the same equations in the TPS65086100RSKT data sheet for the ILIM?


    • Can I use the BOOSTXL-TPS650861 EVM to check my power sequence design?


    What tests can I do with the BOOSTXL-TPS650861 EVM?

    What tests can I do with the TPS65086x Evaluation Module?


    In case I want to check my power sequence design using the TPS65086x Evaluation Module.

    Can I use the BOOSTXL-TPS650861 EVM to burn the second OTP in the PMIC in the TPS65086x Evaluation Module?


    Regards,

    Moshe

  • Hi Moshe,

    Here are the responses to your questions:

    Could you please add more info on the RC filter?

    The RC filter on the feedback pin that we mention in the schematic checklist is optional and could be added in prototype boards. It is basically a RC snubber circuit to filter high frequency noise to help reduce the switching spikes and ringing during the debug of the prototype. This option was also included in our EVM but the components were not populated.


    Is this ILIM calculator support the same equations in the TPS65086100RSKT data sheet for the ILIM?

    Yes. This is correct. Those equations can also be found in the design guide TPS65086x Design Guide


    Can I use the BOOSTXL-TPS650861 EVM to check my power sequence design?

    Yes! If you are doing a custom OTP configuration, the programming BoosterPack (BOOSTXL-TPS650861 EVM User’s Guide) along with the OTP generator must be used to verify the OTP settings before building the prototype board. Which SoC are you powering with this PMIC? Please note that getting production material with a custom OTP configuration requires our customers to work with an approved TI distributor (like Arrow) for programming services. 


    What tests can I do with the BOOSTXL-TPS650861 EVM?

    What tests can I do with the TPS65086x Evaluation Module?

    BOOSTXL-TPS650861 EVM is mostly use to program the OTP memory and check things like output voltage settings, power-up/down sequence, etc. This board has the IC in a socket so the additional parasitic introduced by the socket makes this board not ideal to validate the PMIC performance. 

    TPS650860EVM-116 can be used to evaluate and test the characteristics, operation and performance of the PMIC as it is closer to the real application with the IC soldered down with a more optimized layout and external components closer to the PMIC. The PMIC external components on the EVM could be replaced to evaluate a specific use case.  


    In case I want to check my power sequence design using the TPS65086x Evaluation Module.

    Can I use the BOOSTXL-TPS650861 EVM to burn the second OTP in the PMIC in the TPS65086x Evaluation Module?

    The programming booster pack normally comes with one TPS65086100 PMIC which has two "blank" OTP memories for customers to program it and match specific power/sequence (and other) requirements before the device is soldered into the prototype board.  

    Thanks,

    Brenda

  • Thanks Brenda!


    • Regarding your question:

    “Which SoC are you powering with this PMIC?”

    This is Microchip Soc.


    • In case I want to check my power sequence design using the TPS65086x Evaluation Module.

    Is this Board include PMIC device that burn only the first OTP?

    If the answer is yes, Can I use the BOOSTXL-TPS650861 EVM to burn the second OTP in the PMIC in the TPS65086x Evaluation Module?

    I will connect all the controls I2C, CTL4 and IRQB to 7V from BOOSTXL-TPS650861 EVM.

    The motivation is to check my configuration on the TPS65086x Evaluation Module.


    • The TPS65086x Evaluation Module includes Diode, Schottky (D7, D8).

    What is the purpose of those diodes?

    Do I need to add those diodes to my design?


    Regards,

    Moshe

  • Hi Moshe,

    We are experiencing high volume of customer support for this PMIC. We will be going through the information in the message above and an update will be provided within the next two business days. 

    Thanks,

    Brenda

  • Hi Moshe,

    We have the BoosterPack specifically to program the OTP and it comes with one TPS65086100 (user programmable version) inside the socket. If needed (and for prototype ONLY), you could also burn the second OTP in the pre-programmed PMIC that comes on the EVM. Please read the EVM user's guide which explains the limitations of the EVM starting at the bottom of page 1.

    Regarding your question on D7 and D8, those should not be needed on your design. They were most likely included in the EVM to protect the 1.8V pull-up supply if we needed to apply 7V on CTL4 for entering programming mode and 7V on IRQB for burning the OTP.

    Your schematic is being reviewed by James Steenbock, one of my team mates who is actively working on this PMIC as well. He will get back with our feedback by end of the day. 

    Thanks,

    Brenda

  • Hi Moshe,

    I have reviewed your schematic for the TPS65086100 as well as the external passive components.

    This is my feedback:

    • There are many capacitors at the output of BUCK1, BUCK2, and BUCK6 but as long as you used the equations from Section 6.2.1.2.1.2 of the data sheet to calculate the necessary amount of capacitance, it should be fine.
    • BUCKs 1,2, and 6 each have a resistor divider connected to the FBVOUTx pins. Only BUCK1 supports this configuration and BUCK1 should only have a resistor divider when operating in the "EXT FB" mode to generate a 5V output. I noticed that R182. R183, and R184 are marked with "NS". If this indicates that the component will not be populated then the design you have should be fine. The blue circle in the picture below marks the resistor divider configuration I'm referencing.
    • For the FBGND2 pin (PIN 1), I noticed you have the line connected to the positive terminal of the output capacitors. This pin should be routed to the negative terminal of the output capacitors. In this case that would be the GND node. The red circle in the picture below shows the connection I'm referencing on BUCK2.


    • Route FBVOUT2 differentially with FBGND2 in your layout
    • If GPO1, GPO2, and GPO3 do not have pull-up resistors, they need to be configured to "push-pull" in the OTP settings. I'm not sure if they have pull-up resistors somewhere not shown in the schematic.
  • Thank you James for your review!


    • Regarding the capacitors at the output of BUCK1, BUCK2, and BUCK6.I agree with you that there are many capacitors, but I used section 6.2.1.2.1.2 – Equations 7,8,9,10.It seems that Equation 8 is the worst case.

    For example, Equation 8 - Buck2 (0.82V – 9.5A max current - Dreated x2 = 19A)

    Vout = 0.82V

    Itran(max) =19A

    L= 0.15uH

    Vover = 3% of 0.82 = 0.0246

    According to Equation 8 -> Cout > 2700uF

    The number looks very high.

    What do you think?

    • Regarding the resistor divider connected to the FBVOUT1,2,6.

    BUCKs 1,2, and 6 each have a resistor divider connected to the FBVOUTx pins.

    If only BUCK1 supports this configuration ("EXT FB" mode) why your TPS650860 Evaluation Module supports a resistor divider on Buck 2,6?

    Could you please add more info regarding "EXT FB" mode?


    Regards,

    Moshe

  • Thanks Brenda!


    • Regarding the TPS650860 Evaluation Module.

    The BUCK1 voltage is 1.05 V (Step size -10mV)

    In case I want to change it to 2.5V (Step size -25mv)


    Can I do it? If the answer is no please explain if we have a programming registers that we can’t change by I2C after programing the OTP.


    Regards,

    Moshe

  • Hi Moshe,

    Changing the step size will require programming a blank OTP bank using the OTP generator. This information information can also be found in the datasheet (see highlighted info in the capture below). James will respond to the other questions you had in the previous message. 


    Thanks,

    Brenda

  • Hi Moshe,

    • As long as you used those equations from Section 6.2.1.2.1.2, it should be fine. The design can be further tested and changes to the capacitance can be made if necessary based on prototype results, but if your selection works then there is no need to change.
    • EXT FB refers to "external feedback". This configuration only applies to BUCK1 as shown in the datasheet, Section 4.7. The parameter VFB_EXT_BUCK1 is only used in relation to BUCK1. I see on the TPS650860EVM schematic that there are resistors marked "DNP" on the feedback lines of all three buck controllers but only BUCK1 makes use of this space when it is set up to use the external feedback control.
  • Hi Guys,

    I want to use GPO1,2,3 as configured to push-pull.

    - What the Vol max and the Voh minimum for those outputs?

    - Are those outputs use the LDO3V3 LDO?

    In case i will use the GPO1,2,3 as configure to open drain.

    - Can i connect 1.8V pull-up or 3.3V pull-up to those pin?

    Thanks,

    Moshe

  • Hi Moshe,

    • The GPOx pins have a Vol max value of 0.4V according to Section 4.13 of the datasheet, but there is no established Voh. If the GPOx pins are configured for push-pull, they will be driven to the proper voltage internally. You will still have access to the LDO3P3 output even if the GPOx pins are set to push-pull, without affecting their operation.

    • If you decide to use the GPOx pins in the open drain configuration, you may use the LDO3P3 output as a pull-up source without issue. Note that the absolute max voltage rating for these pins is 3.6V as shown in Section 4.1 of the datasheet (GPO4 can use 7V during the OTP programming procedure).

    Thanks,

    James

  • Thanks James,

    In case GPO1,2,3 as configured to push-pull.

    - Are those outputs use the LDO3V3 LDO (3.3V) – ‘1’ ---> 3.3V?


    In case i will use the GPO1,2,3 as configure to open drain.

    - Can i connect 1.8V pull-up to those pins (LDO1A that configure to 1.8V will connected to these pull-ups)?

    Regards,

    Moshe

  • Hi Moshe,

    1) The GPOx outputs use LDO3P3 in push-pull mode. This information actually comes from the TPS65086100 Non-Volatile Memory Programming GuideSection 4.1.5.

    Also, I should clarify that GPO4 doesn't have a push-pull option, only open drain. For GPO1-3, the internal 3.3V LDO will drive the "high" signal in push-pull mode.

    2) You may use 1.8V from LDOA1 as a pull up source without issue.

    Thanks,

    James

  • Thanks James,

    I want to use 1.8V from LDOA1 that will be connected to pull-up.

    This pull-up will connect to CTL1 to enable all the regulators in the PMIC.

    Do you see any problem with that case?


    Regards,

    Moshe

  • Hi Moshe,

    Connecting LDOA1 to CTL1 should be fine as long as you can ensure that CTL1 will not be enabled before VSYS, V5ANA, LDO5P0, LDO3P3, and LDOA1 are all stable. If the regulators are enabled before source voltages are stable, a power fault may occur. 

    Thanks,

    James

  • Thanks James,

    I have the BOOSTXL-TPS650861 EVM and I want to program the second OTP bank for the following PMIC devices that I have:

    TPS6508641RSKT

    TPS65086470RSKT


    My motivation is to check my design for TPS65086100RSKT with the above devices that available right now.

    I have only one chip of TPS65086100RSKT.

    Do I need a special drivers for TPS6508641RSKT and TPS65086470RSKT devices or special .json and .js files?

    Please send me all information.

    Regards,

    Moshe

  • Hi Moshe,

    For prototyping purposes, you should be able to use the TPS650861 programming template for the TPS650864x PMICs. Just pick the "TPS650861" option from the "Select Device" drop down menu when you create a new project. No additional files should be required if you already have the BOOSTXL set up for TPS650861 programming. I'll relink the programming guide for easy access just in case, but if you have already been working with the GUI you should have everything you need.

    TPS65086100 Non-Volatile Memory Programming Guide

    Thanks,

    James

  • Thanks James,

    In case i will program two OTP banks in the TPS65086100RSKT.

    How can i choose between the versions that located in OPT bank0 and OTP bank1?

    Can i use only the last version (OTP bank) that i program?

    Regards,

    Moshe

  • Hi Moshe,

    Once you program and burn the second OTP bank (bank1), you will not be able to revert back to the first bank (bank0). The bit specifying the OTP path will be burned to "1" to signify the bank1 OTP path, and there is no way to reverse this bit once it is burned in. You can still load the bank0 OTP settings after the device powers on but the default power-up sequence will always follow the second OTP bank after it is burned in. As a side note, if you immediately program bank1 without programming bank0 you are still locked out of bank0.

    Thanks,

    James

  • Thanks James,

    A few questions regarding TPS65086100RSKT output accuracy:

    Regarding Buck1,2,6 output accuracy. According to datasheet pg10 , Output accuracy is ±2.0%.What is the rail over all accuracy includes feedback accuracy?

    Regarding Buck3,4,5 output accuracy. According to datasheet pg11 , Output accuracy is ±2.5%.What is the rail over all accuracy includes feedback accuracy?

    Regards,

    Moshe

  • Hi Moshe,

    The overall accuracy range for BUCK1,2, and 6 (including ripple) is -30mV to 40mV but this is the only additional accuracy qualifier.

    The specifications in the data sheet include all the relevant accuracy information we have at this time. There doesn't appear to be documentation on feedback accuracy.

    Thanks,

    James

  • Thanks James,

    I'm familiar with all those numbers from data sheet pages 10,11.

    Do you have any option to calculate/simulate rail overall accuracy according to the following use case?

    BUCK2 – 0.82V@9.51A max current (peak) – Tolerance +/-2.5%

    BUCK5 – 0.82V@1.1A max current (peak) – Tolerance +/-2.5%

    BUCK4 – 0.95V@0.83A max current (peak) – Tolerance +/-2.5%

    BUCK3 – 1.8V@0.17A max current (peak) – Tolerance +/-2.5%

    BUCK6 – 1.2V@12A max current (peak) – Tolerance +/-4%


    Can I calculate the overall accuracy of those rails?

    Is rail over all accuracy change if Buck1,2,6 configure to Force PWM or Auto mode?

    What can I do to improve the overall accuracy and to support +/-2.5% accuracy?

    Do I need to take into account only the Total output voltage accuracy according to data sheet when I want to calculate overall accuracy? (For example, feedback accuracy)


    Regards,

    Moshe

  • Hi Moshe,

    For testing of the TPS6506100, I would recommend using the Evaluation Module: TPS650860EVM-116

    This board can be used to test the chip functionality and gather accuracy data according to our recommended specs. Voltage rail outputs can be adjusted during operation to match your needs but any output voltage outside the range of our testing conditions may deviate from the datasheet spec.

    Accuracy information remains the same regardless of Force PWM or Auto mode but the test conditions for the +/-2% accuracy rating only extends to a lower limit of 100mA for BUCK 1, 2, and 6. Additional accuracy information below that point would require additional testing with the EVM. The accuracies for BUCK 3, 4, and 5 are also subject to the current and voltage testing conditions. There should not be a significant difference in accuracy between Force PWM and Auto modes otherwise. 

    Total output voltage accuracy should be considered in your calculation if the load current sits around 10mA in order to match our testing conditions.

    Following the recommended schematic and layout advice from the TPS65086x Schematic and Layout Checklist is a good starting point to ensure proper performance. Further optimization in accuracy or other metrics can be done manually with the EVM linked above.

    Regards,

    James

  • Thanks James,


    We will do all the accuracy test on the TPS650860EVM-116 that we have.

    Do you have any option to calculate/simulate rail overall accuracy according to our use case?

    I’m asking it because there is a variation between devices because of the process.

    I’m worried that we will know the real rail overall accuracy only in mass production and not on TI EVM.

    Is there any option to know the rail overall accuracy with calculate/simulate or in prototype stage?

    According to Ti experience and after you have our power rails requirements, do you think the overall accuracy can support +/-2.5% accuracy?


    Regards,

    Moshe

  • Hi Moshe,

    We do not have any additional calculations or simulations for accuracy besides what is displayed in the datasheet. All TPS650861 parts are tested in production to meet the specifications so no other additional accuracy measurements should be necessary. 

    As long as your power rails are within the proper operation range, the rail accuracy should match our report. Even with process variation these devices should not deviate from the spec with the proper external components and operating conditions.

    Regards.

    James