This thread has been locked.

If you have a related question, please click the "Ask a related question" button in the top right corner. The newly created question will be automatically linked to this question.

WEBENCH® Tools/LM25017: Using Fly-buck to get 24V (+/-10%) from 16V to 33V input

Part Number: LM25017

Tool/software: WEBENCH® Design Tools

Hi,

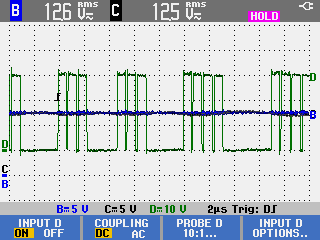
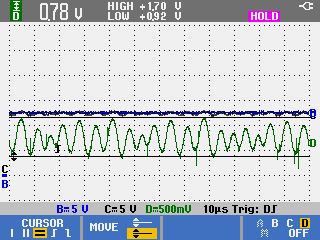
I am looking into using the LM25017 in Fly-Buck mode to generate approximately 24V output from 16V to 33V input.  In order to keep costs down, I would like to use off the shelf coupled inductors.  It seems Coilcraft has lots of 1:1 coupled inductors, but also offer some 1:2, 1:3 and 1:10.

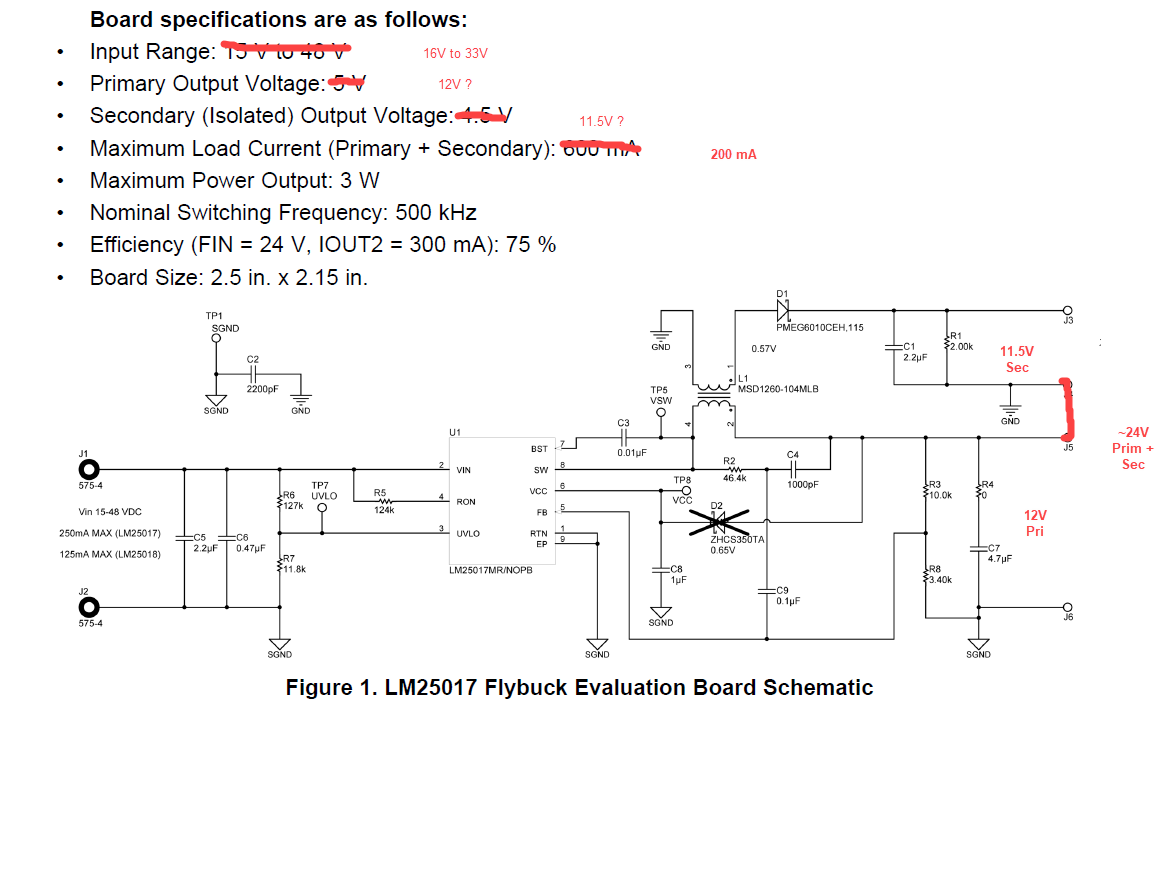
My thoughts on how to do this are in the marked up LM25017 EVM schematic, below.  I am thinking that if I generate 12V on the primary side, and get about 11.5V on the secondary, I could connect the Ground of the secondary to the V+ of the primary to create approximately 24V total.  However, I read in the datasheet that maybe it is best to keep Vout_primary < Vin_min/2?  If so, would it be better for me to use a 1:3 inductor, and make V_primary = 6V?

Is the concept that I have here make sense to do, or is this idea silly?  One potential benefit of this over a SEPIC design is that I could use the lower voltage primary side to power my LDO for other low voltage logic parts, which should reduce some power loss in the LDO.

Before asking this question, I tried to use WEBENCH to simulate, but I wasn't able to figure out how to change the turns ration of the custom transformer that was automatically placed in the design.  Any help with getting started simulating this circuit would also be greatly appreciated.

  • Hello Robbie,

    The design approach is feasible. Pin 3 of the transformer needs to be connected to Vout Pri too. Also remove Gnd connection when connecting the return side of the 11.5V to Vout primary.

    Hope this helps?
  • Hi Robbie,

    One option is to connect the primary side as an inverting buck-boost to get a regulated -24.5V output. Then use a 1 : 1 turns ratio transformer to get an isolated 24V output.

    You can use the Fly-Buck quickstart calculator available online to assist with the design: www.ti.com/.../toolssoftware

    Regards,
    Tim

  • Hi, Thanks for the quick answers.

    I've been testing this concept out on the LM25012MRFBEVM eval board.  However, I am having issues where the Primary Output is not regulating at 12V. Instead, it changes between 12.5V and 13.5V, generally increasing as the input voltage increases.  I am concerned that something is wrong in my calculations for the Type III ripple circuit, and I need some feedback/help.

    Originally I had modified the Feedback resistors to be R3 (Rfb2) = 86.6k, R8 (Rfb1) = 10k, R2 (Rr) = 10k, while leaving C4 (Cr) = 1000pF, and C9 (Cac) = 0.1uF.  This setup caused the problem where the Vout1 was not regulated well.  I made Cr = 10,000pF, and the Vout1 was fixed, were it became very close to the 12V expected output.

    Since the Feedback resistor values were much smaller in the original eval board, I decided to try to decrease the resistance of Rfb1 and Rfb2, so I set these to Rfb2 = 35.7k, and Rfb1 = 4.02k. I then made Rr = 4.02k, while leaving Cr = 10,000pF, and Cac = 0.1uF.  Again, the Vout1 would no longer stay in regulation.

    I attempted to change Cr = 4700pF, so it was closer to the recommended value of 3300pF.  This did not fix the problem.  I took the image below of the voltage on the FB pin, as you can see, I am getting over 400mV of ripple

    I then changed Rr to 10k, (Cr still = 4700pF), and the voltage on the FB pin had reduced ripple, as expected, but the Vout1 was still not regulated.

    Am I getting too much ripple, or is there something else that I can do to make the primary voltage better regulated?  I can go back to the Rr=10k, and Cr=10,000pF, but I don't want to do that unless I understand why that test worked, and these others didn't.

    Any help is appreciated.

    Thanks!

    Robbie

  • Hello Robbie,

    It looks like your Rr and Cr are not set up correctly. Please use a value of Rr = 100k and Cr= 4.7nF. keep Rfb top = 86k and Rfbbot = 10k.

    Hope this helps?
  • Hi David,

    I tried to use the values you suggested.  It seems like those values help the primary output to stay at 12V if there is a somewhat significant load on the secondary, of 80mA or so.  However, when it is operating under "no-load" (except for the EVM 2k resistor across the isolated 12V), the Vout1 voltage changes from 10.8V to 12.5V as the input is changed from 18 to 30V.  I tested having "no-load" on the Secondary Vout2, but placing the 80mA load on Vout1, and the Vout1 voltage still varies from 10.8V to 12.5V as the input voltage is changed.

    The images below are from a no-load test.  Trace D is on the SW node.  It is acting in an unexpected way, where it gives 2-3 ON pulses, and then shuts off for a longer time.  (during the 80mA load test, the SW waveform looks more normal, where it has a nice ON-OFF cycle. (Trace C is the Vout1, and B is Vout2).

    The image below is the same no-load test, looking at the voltage on the FB pin.  It is no longer a nice triangle wave.

    Is it normal for these regulators to require a large load on the secondary output, in order to keep the primary output in regulation?

    Thanks,

    Robbie

  • Hello Robbie,

    The ripple voltage needs to be triangular in form, the fact that it looks sinusoidal suggests that Vout ripple (too much ripple due to charge/discharge of output cap) is coupling to the FB node and causing a phase shift? Can you start to reduce Cac from 0.1uF until the waveform is periodic at the Vsw node. Check VFB and make sure you have ~25mV there and the ripple is in phase with Vsw.

    Alternatively you can try increasing both couts too, this will reduce capacitor ripple at the outputs minimizing Vout ripple coupling to the FB node. I would try above first.

    Hope this helps?