This thread has been locked.

If you have a related question, please click the "Ask a related question" button in the top right corner. The newly created question will be automatically linked to this question.

BQ76940: Tips/Reminders before powering up

Part Number: BQ76940

Good day,

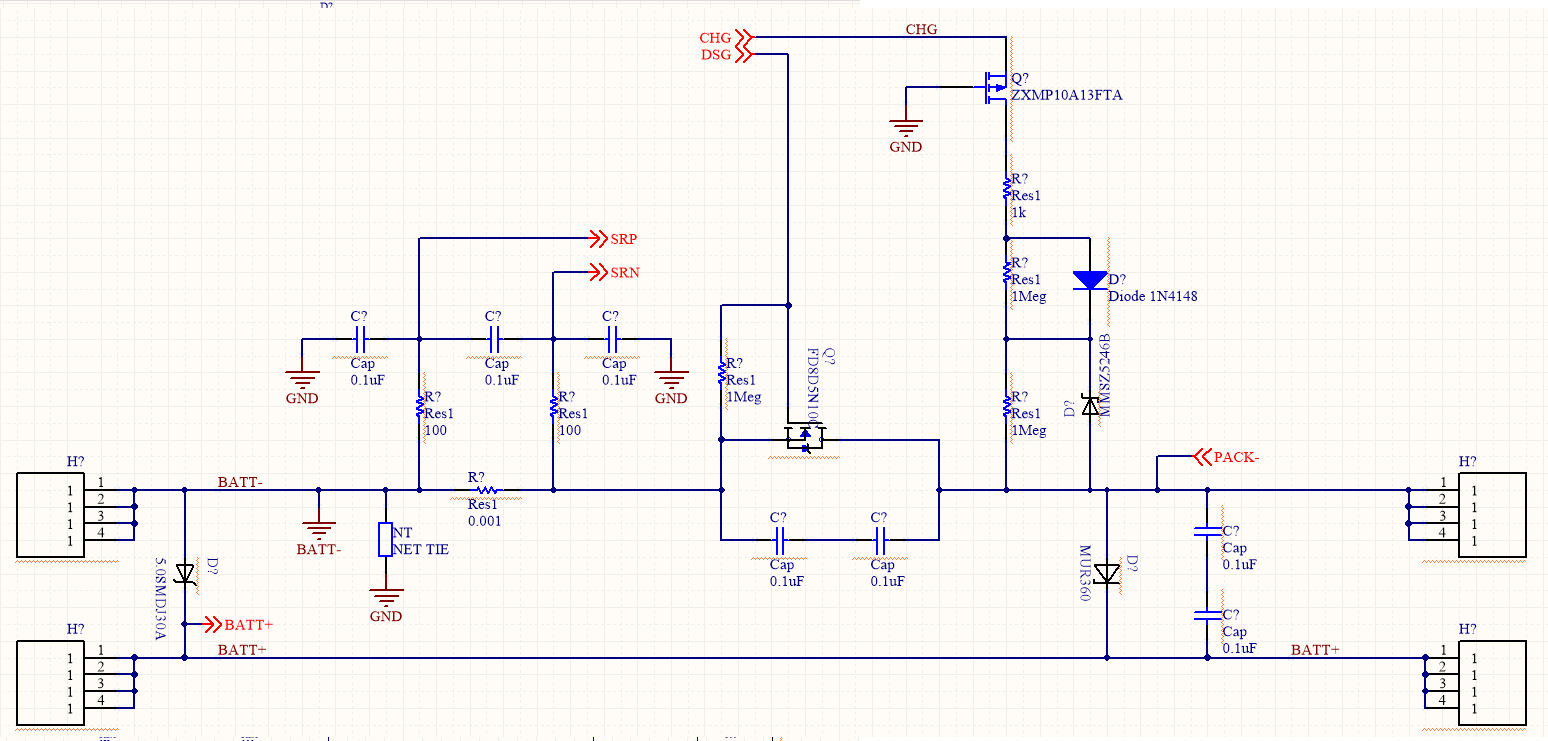
I had just finished soldering components into my board (https://e2e.ti.com/support/power-management/f/196/t/771358), and would like to ask if there's anything I should take into account before actually powering up my board with 36V of DC supply, as I don't want to destroy it.

Also, is there a guide on how to test for each BQ76940 functionality (Overvoltage, undervoltage, short circuit, etc)?

  • Hi Robert,

    Connecting the cells from the bottom up is generally the safest approach. See Section 10 of this app note: http://www.ti.com/lit/an/slua749a/slua749a.pdf

    If you are using a DC supply, are you using a resistor divider to apply voltages to each cell input?

    Best regards,

    Matt

  • Thanks for that link!

    Matt Sunna said:

    If you are using a DC supply, are you using a resistor divider to apply voltages to each cell input?


    May I ask what you mean by this? What I was planning to do was just apply 36V to the board (with the positive terminal on BATT+, and the negative terminal on PACK-), and then check if the AFE and microcontroller powers up correctly.

  • Hi Robert,

    The BQ76940 is battery monitor that monitors the cell voltages of each cell of the battery. If there is no voltage on the individual cell inputs (VC pins), then you may get an under-voltage fault which will cause the DSG FET to open. From your schematic, it also looks like you are missing the CHG FET?

    You may want to take a quick look at this video that guides you through the process of creating a schematic for this device to make sure you have everything in place: https://training.ti.com/how-create-schematic-bq76920-bq76930-and-bq76940

    Best regards,

    Matt

  • Thanks for the reply Matt,

    About the missing CHG FET, my bad, that was the wrong schematic I showed you. Is it possible for you to take a quick look at my latest schematic? I used (http://www.ti.com/lit/df/tidr773/tidr773.pdf) as reference.

    Attached Schematic.rar is a sheet of schematic (I use Altium) and if you could just take a glance and see if there's something not quite right, please inform me. (Well, I already ordered and have this board so..)

    About the resistor divider in your earlier reply, is it or is it not included in the reference schematic in (http://www.ti.com/lit/df/tidr773/tidr773.pdf)?


    Thank you very much,
    Robert

  • Hi Robert,

    Ok, I see. The schematic looks mostly good to me after reviewing the connections briefly. I think you might be missing a connection from BATT+ to C15 though.

    On our EVM, we have a resistor divider that can be used to simulate cell voltages - applying power to BAT+ and BAT- on the EVM will apply the same voltage across each VCx input through the resistor divider. A resistor divider is not a normal part of real battery, but can be useful on an EVM if you don't have individual cells available to connect to the cell connectors.

    For your board, your cells will be connected to Header10, so there is no need for a resistor divider. 

    Best regards,

    Matt

  • Thanks a lot, I really appreciate your help.

    About the missing connection from BATT+ to C15, I unfortunately missed the part where it said "Selection options, populate one only if used". Is it possible to just solder a wire wrap across the nearest solder pads for BATT+ and C15?

    Another question; can I apply a 36V across the BATT+ and PACK- without connecting the 9 battery cells yet (leaving header 10 open)? Just so I could power up the microcontroller and code/debug my software.

  • Hi Robert,

    I think it should be fine if you make the BATT+ to C15 connection across the nearest solder pads.

    If you apply 36V without connecting the battery cells, I think you may have problems. Cell under-voltage faults will be triggered and some power pins will be left unpowered (VC5X, VC10X) which may cause a Device_Xready fault. The cleanest option would be to plug 200 ohm resistors across each of the terminals of header 10 which will create a resistor divider supplying ideal voltages to each cell input.

    Best regards,

    Matt

  • Noted. What power rating should the 200 ohm resistors be?

    And also, can you suggest where the good placement of the thermal resistors should be? I'll be using a 9 series, 4 parallel battery pack.

    Thanks!

  • We use 0.125W resistors on the EVM - these don't need to be high power.

    The thermistors should be placed on or as close as possible to battery cells - it depends on the construction of your battery which cells will be hotter. The thermistors can also be used to monitor FET temperature if needed.

    Best regards,

    Matt

  • Thanks, hopefully I power up the board successfully next week. Appreciate your help, Matt. Thanks!

  • Hi Matt, quick question about a resistor value:

    From http://www.ti.com/lit/df/tidr773/tidr773.pdf, sheet 4, R75 is 100kohms. Unfortunately I don't have a supply of 100kohms resistors right now. Is it possible if I use a 499kohm resistor instead?

  • Hi Robert,

    It should be okay to use a different value. 499k may be fine, but if you have something in the range of 50k-200k, it might be better since it will not slow down the turn-on time as much as a really large value. 

    Best regards,

    Matt