This thread has been locked.

If you have a related question, please click the "Ask a related question" button in the top right corner. The newly created question will be automatically linked to this question.

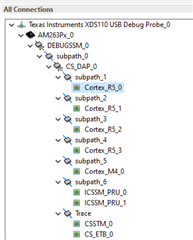
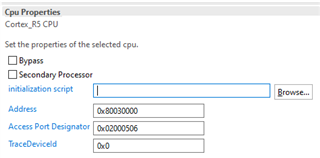
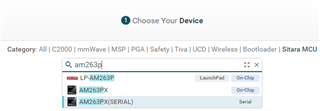
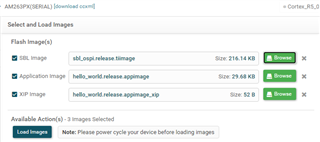
[FAQ] AM263P4: How to debug XiP application in AM263PX

Part Number: AM263P4
Other Parts Discussed in Thread: UNIFLASH

Tool/software:

How to create and debug XIP application in AM263PX (DEV/OSPI boot mode)?

  • 1. For enabling XIP application refer: [FAQ] AM263P4: Enabling XIP in AM263PX - Arm-based microcontrollers forum - Arm-based microcontrollers - TI E2E support forums

    2. NOTE:

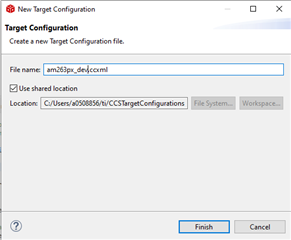
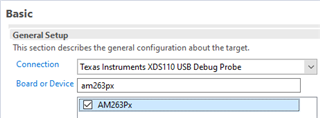
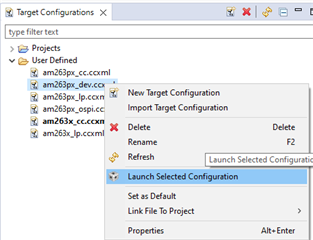
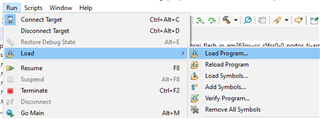
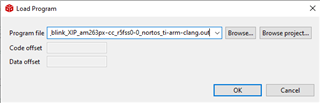
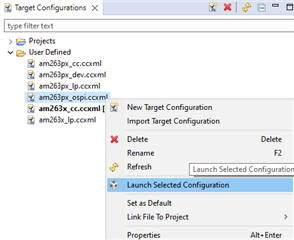
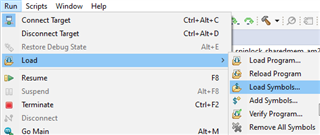
    This FAQ scopes debugging XiP application for two most commonly used boot modes i.e. Dev Boot Mode (preferred for development) and OSPI Boot Mode (preferred for production).

    Dev Boot Mode: Step3, Step4, Step5, Step6, Step7, Step8
    OSPI Boot Mode: Step3, Step4, Step5, Step9, Step10, Step11

    3. Create a function for infinite loop (loop_forever):

    void loop_forever(void){
        volatile uint8_t i=1;
        while(i);
    }

    4. Call loop_forever function after start of main function. This will only work for debugging "after main".

    5. Build example after enabling XIP and adding infinite loop using above steps.

    • Open Project explorer.
    • Right Click on project name.
    • Select "Build Project" to build it.

    6. Target Configurations for debugging XIP in DEV boot mode

    • For debugging XIP in dev boot mode target configurations should consists of GEL configurations.
    • Go-to 'View' → 'Target Configurations'.
    • Select 'New Target Configurations'
    • Double click on newly added 'am263px_dev.ccxml' to open it.
    • Select Connection as 'Texas Instruments XDS110 USB Debug Probe' and Device as 'AM263Px'. 
    • Save Configurations.

    7. Debugging XIP in DEV boot mode

    • Connect device in DEV bootmode.
    • Launch Target configuration for DEV bootmode ('am263px_dev.ccxml').
    • Connect Target.
    • To flash program image: Go-to "Run"→ "Load" → "Load Program".
    • Select generated .out image for XIP application in Step5.
    • Click "Resume"

    8. Pause program 

    • You program will be looping at infinite while loop.
    • Click Pause.
    • Add 'Hardware breakpoint' in your program at required positions.
    • Go-to 'View' → 'Variable'.

    • In 'Variables' window you can see 'i' with variable value as '1'.
    • Update value of variable i of while loop as i!=1.
    • Click 'Resume' 
    • After resuming, it will exit the while loop and now you can debug the program using breakpoints

    9. Target Configurations for debugging XIP in OSPI boot mode

    • For debugging XIP in ospi boot mode target configurations should not consists of GEL configurations.
    • Go-to 'View' → 'Target Configurations'.
    • Select 'New Target Configurations'.
    • Double click on newly added 'am263px_ospi.ccxml' to open it.
    • Select Connection as 'Texas Instruments XDS110 USB Debug Probe' and Device as 'AM263Px'. 
    • Go-to 'Advanced Setup' → 'Target Configuration'.
    • Select destination core (Cortex_R5_0).
    • Go-to 'Cpu Properties' and make 'initialization script' as empty.
    • Save Configurations.

    10. Debugging XIP in OSPI boot mode

    • Flash IMAGE
      • Connect device in UART bootmode. 
      • Open Uniflash tool.
      • Select Device as am263px (Serial).
      • Start session.  
      • Select images to be flashed.
      • Update COM Port and choose 'Load Images'.
      • On successful flashing Uniflash will print success logs.
    • Chage device boot mode to OSPI boot mode ('am263px_ospi.ccxml').
    • Launch Target configuration for OSPI boot mode ('am263px_ospi.ccxml').
    • Connect Target.
    • Go-to "Run" → "Load" → Select "Load symbols".
    • Press Reset button on connected AM263px device.

    11. Pause program

    • You program will be looping at infinite while loop.
    • Click Pause.
    • Add 'Hardware breakpoint' in your program at required positions.
    • Go-to 'View' → 'Variable'.

    • In 'Variables' window you can see 'i' with variable value as '1'.
    • Update value of variable i of while loop as i!=1.
    • Click 'Resume' 
    • After resuming, it will exit the while loop and now you can debug the program using breakpoints


    Regards,
    Gunjan