Other Parts Discussed in Thread: SYSCONFIG, AM625, TCA6424
Hi Hong ,
Thanks for your continous support.
Continuinfg with this thread => https://e2e.ti.com/support/processors-group/processors/f/processors-forum/1303310/processor-sdk-am62x-how-to-make-signed-boot-and-fast-boot-time/5101338#5101338
Please support to convert our HS-FS AM6231 customised device into secure device .
Pease find below observations to make HS-FS device into secure.
JFYI , LINUX SDK i am using => 09_00_00_03 Version
MCU_PLUS_SDK using => 09_00_00_19 Version.
Below Pre-requisites i downloaded.
- Downloaded MCU_PLUS_SDK (mcu_plus_sdk_am62x_09_00_00_19-linux-x64-installer.run) , ccs (CCS12.3.0.00005_linux-x64.tar.gz) and sysconfig (sysconfig-1.16.1_2960-setup.run) and ti_cgt_armllvm_2.1.3.LTS_linux-x64_installer.bin from https://www.ti.com/tool/download/MCU-PLUS-SDK-AM62X/09.00.00.19
- installed ccs and sysconfig
- otp_keywriter_am62x-linux-installer.run downloaded this file from Ti security portal.
Below steps I followed to generate the image:
- I run the mcu_plus_sdk_*.run , installed at /home/<user>/ti path
- created the security folder in source code of ~/ti/mcu_plus_sdk_*/source path
- I did run the "otp_keywriter_am62x-linux-installer.run" and gave the installation has " ~/ti/mcu_sdk_*/source/security"
- so , generated "tifs/sbl_keywriter" is generated under " ~/ti/mcu_sdk_*/source/security " so , as per otp instructions i moved sbl_keywritter directory to security directory and removed tifs folder . now path like -> ~/ti/mcu_sdk_*/source/security/sbl_keywritter instead of ~/ti/mcu_sdk_*/source/security/tifs/sbl_keywritter.
- moved to this path <MCU_PLUS_SDK_INSTALL_DIR>/source/security/sbl_keywriter/scripts/cert_gen/am62x and issued below command
./gen_keywr_cert.sh --msv 0xC0FFE -t tifek/ti_fek_public.pem
=> This will generate a certificate with MSV data at " <MCU_PLUS_SDK_INSTALL_DIR>/source/security/sbl_keywriter/scripts/x509cert/final_certificate.bin "
- Convert the certificate binary to .h format.
- Go to the x509 script directory: <MCU_PLUS_SDK_INSTALL_DIR>/source/security/
sbl_keywriter/scripts/x509cert
- Go to the x509 script directory: <MCU_PLUS_SDK_INSTALL_DIR>/source/security/
python3 ../../../../../tools/bin2c/bin2c.py final_certificate.bin keycert.h KEYCERT
-
- This will generate a C header file called keycert.h
Build
- Go to the following directory: <MCU_PLUS_SDK_INSTALL_DIR>/source/security/
sbl_keywriter/am62x-sk/r5fss0-0_nortos/ti-arm-clang - Clean the build using -> make -sj clean PROFILE=debug
- Then run: make -sj PROFILE=debug => HERE I GOT ISSUES , please find the log
LOGS
naresh@naresh-ThinkPad-E15-Gen-2:~/ti/mcu_plus_sdk_am62x_09_00_00_19/source/security/sbl_keywriter/am62x-sk/r5fss0-0_nortos/ti-arm-clang$ make -sj PROFILE=debug
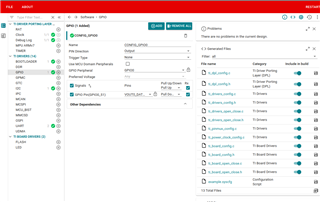
Generating SysConfig files ...
Running script...
Validating...
Generating Code (example.syscfg)...
Writing /home/naresh/ti/mcu_plus_sdk_am62x_09_00_00_19/source/security/sbl_keywriter/am62x-sk/r5fss0-0_nortos/ti-arm-clang/generated/ti_dpl_config.c...
Writing /home/naresh/ti/mcu_plus_sdk_am62x_09_00_00_19/source/security/sbl_keywriter/am62x-sk/r5fss0-0_nortos/ti-arm-clang/generated/ti_dpl_config.h...
Writing /home/naresh/ti/mcu_plus_sdk_am62x_09_00_00_19/source/security/sbl_keywriter/am62x-sk/r5fss0-0_nortos/ti-arm-clang/generated/ti_drivers_config.c...
Writing /home/naresh/ti/mcu_plus_sdk_am62x_09_00_00_19/source/security/sbl_keywriter/am62x-sk/r5fss0-0_nortos/ti-arm-clang/generated/ti_drivers_config.h...
Writing /home/naresh/ti/mcu_plus_sdk_am62x_09_00_00_19/source/security/sbl_keywriter/am62x-sk/r5fss0-0_nortos/ti-arm-clang/generated/ti_drivers_open_close.c...
Writing /home/naresh/ti/mcu_plus_sdk_am62x_09_00_00_19/source/security/sbl_keywriter/am62x-sk/r5fss0-0_nortos/ti-arm-clang/generated/ti_drivers_open_close.h...
Writing /home/naresh/ti/mcu_plus_sdk_am62x_09_00_00_19/source/security/sbl_keywriter/am62x-sk/r5fss0-0_nortos/ti-arm-clang/generated/ti_pinmux_config.c...
Writing /home/naresh/ti/mcu_plus_sdk_am62x_09_00_00_19/source/security/sbl_keywriter/am62x-sk/r5fss0-0_nortos/ti-arm-clang/generated/ti_power_clock_config.c...
Writing /home/naresh/ti/mcu_plus_sdk_am62x_09_00_00_19/source/security/sbl_keywriter/am62x-sk/r5fss0-0_nortos/ti-arm-clang/generated/ti_board_config.c...
Writing /home/naresh/ti/mcu_plus_sdk_am62x_09_00_00_19/source/security/sbl_keywriter/am62x-sk/r5fss0-0_nortos/ti-arm-clang/generated/ti_board_config.h...
Writing /home/naresh/ti/mcu_plus_sdk_am62x_09_00_00_19/source/security/sbl_keywriter/am62x-sk/r5fss0-0_nortos/ti-arm-clang/generated/ti_board_open_close.c...
Writing /home/naresh/ti/mcu_plus_sdk_am62x_09_00_00_19/source/security/sbl_keywriter/am62x-sk/r5fss0-0_nortos/ti-arm-clang/generated/ti_board_open_close.h...
Compiling: am62x:r5fss0-0:nortos:ti-arm-clang sbl_keywriter.debug.out: ../main.c
Compiling: am62x:r5fss0-0:nortos:ti-arm-clang sbl_keywriter.debug.out: ../keywriter_utils.c
Compiling: am62x:r5fss0-0:nortos:ti-arm-clang sbl_keywriter.debug.out: ../board.c
Compiling: am62x:r5fss0-0:nortos:ti-arm-clang sbl_keywriter.debug.out: generated/ti_drivers_config.c
Compiling: am62x:r5fss0-0:nortos:ti-arm-clang sbl_keywriter.debug.out: generated/ti_drivers_open_close.c
Compiling: am62x:r5fss0-0:nortos:ti-arm-clang sbl_keywriter.debug.out: generated/ti_board_config.c
Compiling: am62x:r5fss0-0:nortos:ti-arm-clang sbl_keywriter.debug.out: generated/ti_board_open_close.c
Compiling: am62x:r5fss0-0:nortos:ti-arm-clang sbl_keywriter.debug.out: generated/ti_dpl_config.c
Compiling: am62x:r5fss0-0:nortos:ti-arm-clang sbl_keywriter.debug.out: generated/ti_pinmux_config.c
Compiling: am62x:r5fss0-0:nortos:ti-arm-clang sbl_keywriter.debug.out: generated/ti_power_clock_config.c
.
Linking: am62x:r5fss0-0:nortos:ti-arm-clang sbl_keywriter.debug.out ...
Linking: am62x:r5fss0-0:nortos:ti-arm-clang sbl_keywriter.debug.out Done !!!
.
Boot image: am62x:r5fss0-0:nortos:ti-arm-clang /home/naresh/ti/mcu_plus_sdk_am62x_09_00_00_19/source/security/sbl_keywriter/am62x-sk/r5fss0-0_nortos/ti-arm-clang/sbl_keywriter.debug.tiimage ...
Traceback (most recent call last):
File "/home/naresh/ti/mcu_plus_sdk_am62x_09_00_00_19/tools/boot/signing/rom_image_gen.py", line 339, in <module>
cert_str = get_cert(args)
File "/home/naresh/ti/mcu_plus_sdk_am62x_09_00_00_19/tools/boot/signing/rom_image_gen.py", line 234, in get_cert
full_image_size = os.path.getsize(args.sbl_bin) + os.path.getsize(args.sysfw_bin) + os.path.getsize(args.boardcfg_blob)
File "/usr/lib/python3.8/genericpath.py", line 50, in getsize
return os.stat(filename).st_size
FileNotFoundError: [Errno 2] No such file or directory: '/home/naresh/ti/mcu_plus_sdk_am62x_09_00_00_19/source/security/tifs/sbl_keywriter/keywr_bin/am62x/sysfw_keywr.bin'
naresh@naresh-ThinkPad-E15-Gen-2:~/ti/mcu_plus_sdk_am62x_09_00_00_19/source/security/sbl_keywriter/am62x-sk/r5fss0-0_nortos/ti-arm-clang$ vim /home/naresh/ti/mcu_plus_sdk_am62x_09_00_00_19/tools/boot/sig
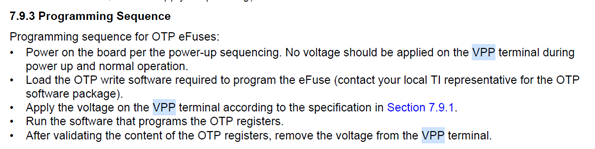
Please find otp key writter document
5074.AM62X_OTP_Keywriter_User_Guide_09_00_00.pdf
Please help me on this.
Thanks,
Naresh