

Hi,
How to build and run the platform test on K2H EVM ?

This thread has been locked.
If you have a related question, please click the "Ask a related question" button in the top right corner. The newly created question will be automatically linked to this question.
How to build and run the platform test on K2H EVM ?
Pre-requisite :
1. Download and install "PROCESSOR-SDK-RTOS-K2HK 06_03_00_106" from https://software-dl.ti.com/processor-sdk-rtos/esd/K2HK/latest/index_FDS.html
( Please install the SDK in the recommended path: C:\ti\)
2. Download and install CCS 9.3 , https://www.ti.com/tool/download/CCSTUDIO/9.3.0.00012
( Please install in the recommended path: C:\ti\)
3. Rebuild the PDK and SDK which in turn will build all the necessary CSL library components etc. Follow the steps given below.
Step1: Check the Platform-test source code after installation
a) Platform-test source code will become available once the " processor_sdk_rtos_k2hk_6_03_00_106 " package (above-step) is installed.
b) "Platform-Lib" is a dependency for Platform-test.
c) The location of source code of Platform-test and platform-lib is at
C:\ti\pdk_k2hk_4_0_16\packages\ti\platform\evmc6657l\platform_test\src
C:\ti\pdk_k2hk_4_0_16\packages\ti\platform\evmc6657l\platform_lib\src
d) Open the platform.c located at C:\ti\pdk_k2hk_4_0_16\packages\ti\platform\evmk2h\platform_lib\src\platform.c
Go to line number :485 and comment the initialization and configuration code of serdes and SGMII
/*
if (p_flags->phy) {
configSerdes();
Init_SGMII(0);
//Init_SGMII(1);
}
*/
e) save and close.
Step 2: Import the "Platform test example" into CCS 9.3 and re-build
Please follow the video attached and do the steps given below for ease of use.
a) Import the "Platform-Lib" CCS project located at "C:\ti\pdk_k2hk_4_0_16\packages\ti\platform\evmk2h\platform_lib" into CCS and rebuild
b) Import the "Platform-Lib" CCS project located at "C:\ti\pdk_k2hk_4_0_16\packages\ti\platform\evmk2h\platform_test" into CCS and rebuild
If face any error in building the platform lib or platform test, please follow the steps given in the below FAQs.
Step 3: Run the "Platform test " on the C6657 EVM
In your evmk2h - board ----> You should put the DIP Switch settings in "No boot mode" to connect to the CCS.
That is ------> DIP SW1 : 0 1 1 1
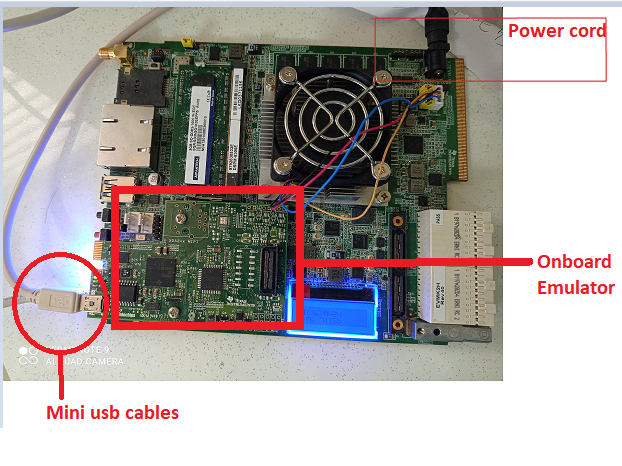
Connection details:
================
1. Power cord
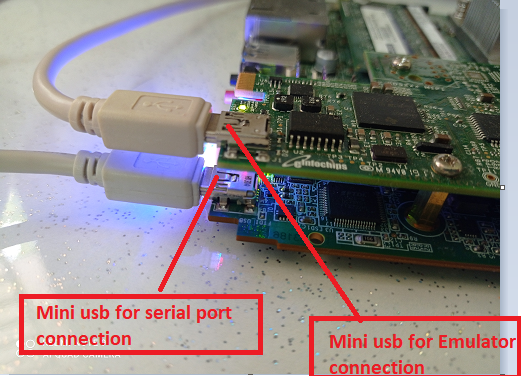
2. XDS- Emulator - Mini usb cable between usb port of onboard-emulator of k2H EVM and PC-running Windows-10
3. Mini usb between the serial port of K2H EVM and the usb port of PC
Please follow the video attached and do the steps given below for ease of use.
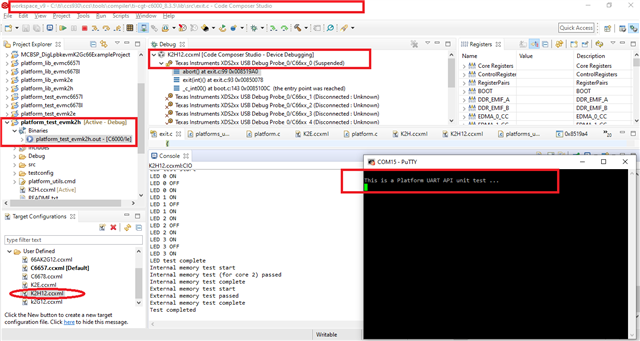
1. Open CCS
2. Launch the target configuration file for evmk2h . ( If new to this, Follow this FAQ
3. Do "Connect target and run gel file " ( If new to this, Follow this FAQ :
4. Load the platform_test_evmk2h.out into core0 of k2h-evm -- ( FOLLOW THE STEPS IN THE VIDEO BELOW )
5. Run and observe the output messages, as per the video below.
Console output messages in CCS
==========================
[C66xx_0] p_info->version	= 3.00.00.09
p_info->cpu.core_count	= 8
p_info->cpu.name	= TCI6636K2H
p_info->cpu.id	= 21
p_info->cpu.revision_id	= 0
p_info->cpu.silicon_revision_major	= 0
p_info->cpu.silicon_revision_minor	= 0
p_info->cpu.megamodule_revision_major	= 9
p_info->cpu.megamodule_revision_minor	= 3
p_info->cpu.endian	= 1
p_info->board_name	= TMDXEVM6636K2H
p_info->frequency	= 983
p_info->board_rev	= 0
p_info->led[PLATFORM_USER_LED_CLASS].count	= 4
p_info->led[PLATFORM_SYSTEM_LED_CLASS].count	= 0
p_info->emac.port_count	= 2
EMAC port 0 connected to the PHY.
MAC Address = 74:da:ea:55:e4:83
EMAC port 1 connected to the PHY.
MAC Address = 74:da:ea:55:e4:83

NAND Device:
p_device->device_id	= 172
p_device->manufacturer_id	= 44
p_device->width	= 8
p_device->block_count	= 4096
p_device->page_count	= 64
p_device->page_size	= 2048
p_device->spare_size	= 64
p_device->column	= 2048
p_device->handle	= 11425
p_device->flags	= 0
p_device->bboffset	= 5
Bad Block Table (only bad block numbers shown):
Could not open the NOR device errno = 0x11

EEPROM Device (@ 0x50):
p_device->device_id	= 80
p_device->manufacturer_id	= 1
p_device->width	= 8
p_device->block_count	= 1
p_device->page_count	= 1
p_device->page_size	= 65536
p_device->spare_size	= 0
p_device->handle	= 80
p_device->flags	= 0
p_device->bboffset	= 0

EEPROM Device (@ 0x51):
p_device->device_id	= 81
p_device->manufacturer_id	= 1
p_device->width	= 8
p_device->block_count	= 1
p_device->page_count	= 1
p_device->page_size	= 65536
p_device->spare_size	= 0
p_device->handle	= 81
p_device->flags	= 0
p_device->bboffset	= 0
Current core id is 0
User switch 1 state is OFF
UART test start
Open a serial port console in a PC connected to
the board using UART and set its baudrate to 115200
You should see following message ---
This is a Platform UART API unit test ...
Type 10 characters in serial console
Char 0 = 1
Char 1 =
Char 2 = 2
Char 3 = 3
Char 4 = 4
Char 5 = 5
Char 6 = 6
Char 7 = 7
Char 8 = 8
Char 9 = 9
UART test complete
EEPROM test start
test_eeprom: passed
EEPROM test complete
NAND test start
test_nand: passed
NAND test complete
NOR test start
test_nand: Could not open NOR device  errno = 0x11
NOR test complete
LED test start
LED 0 ON
LED 0 OFF
LED 0 ON
LED 1 ON
LED 1 OFF
LED 1 ON
LED 2 ON
LED 2 OFF
LED 2 ON
LED 3 ON
LED 3 OFF
LED 3 ON
LED test complete
Internal memory test start
Internal memory test (for core 2) passed
Internal memory test complete
External memory test start
External memory test passed
External memory test complete
Test completed
Video on " how to import, build and run the platform test example on K2H EVM
=================================================================
Regards
Shankari G
